LLaMA代码分析
 Image credit: IndustryWired
Knowledge from reading a paper is shallow;
to truly understand, you must run the code yourself.– You Lu
纸上得来终觉浅,绝知此事要躬行.
– 陆游
为什么写这篇文章?
回顾我学习Transformer的过程, 我用过以下几种方法:
- 读paper: 我读过原始的Transformer paper和一些其他的paper(例如BERT, T5, GPT等). 这种方法的缺点一是效率比较低, paper里经常使用比较难懂的语言来解释很简单的问题, 并且有大段我并不关心的内容. 二是paper会忽略掉大量的细节, 从而产生并不准确的理解.
- 读blog, 看教学视频等: 例如 The Illustrated Transformer. Blog比paper易懂, 但是二手信息, 来源也不可靠, 信息准确度难以保证.
- 看sample code: 比较有名的是 Transformer from scratch. 动手实现transformer, 对理解非常有帮助, 缺点是这是一个用来教学的code base, 和实际公司在用的代码有不少区别, 没法直接用这个代码来做项目.
有没有一个办法, 既能准确理解Transformer的原理, 又能把它用到工作里呢? 我想到的办法就是读懂一个真正在生产中应用的, 效果达到世界先进水平的Transformer代码. 这里我选择了Meta开源的LLaMA.
Prerequisites
本文假设读者已经理解原始的Transformer了. 如果没有, 可以先去看Attention is all you need.
LLaMA和原始Transformer的不同
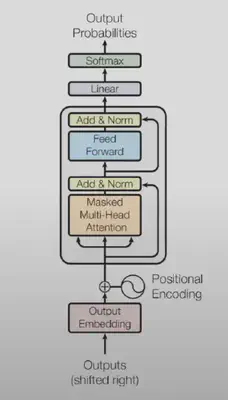
LLaMA是一个decoder-only transformer, 它没有encoder, 也没有cross attention. 注意在下面这张模型架构图里, 模型的输入叫做 “outputs(shifted right)”, 因为decoder的input和output其实是同一个东西, 当前step的output是下一个step的input.

Pre-normalization. 上面这张图是原始的transformer, 它的normalization是加在output上的. 现代的transformer会把normalization加在input上. 下图展示了两者的不同:
用伪代码来表示:
# 原始transformer
h = norm(x + attn(x))
out = norm(h + ffn(h))

# pre-normalization
h = x + attn(norm(x))
out = h + ffn(norm(x))
Rotary Positional Embedding (RoPE). 目前主流都比较喜欢相对位置的positional embedding, 我猜想一方面目前context length越来越大, 如果采用绝对位置来计算, 有可能因为训练数据的长度分布不均导致PE在某些位置没有充分的训练; 另一方面如果考虑某一个短语它在句子中平移时它的意思不会改变, 相对位置的embedding感觉也更符合直觉一些.
RoPE的直觉想法: 假设有一个positional embedding函数 $f(x, l)$ 表示input $x$ 在位置l处的embedding, 我们希望 $f(q, m)$ 和 $f(k, n)$ 的点积只跟相对位置 $(m-n)$ 相关. 所以, 只要我们可以把embedding表示成复数 $f(x, l) = xe^{il}$ , 位置l是复数的转角, 就可以保证上面这点.activation function和normalization function和原始transformer不同. 这个我认为是小细节了, 不再展开.
LLaMA代码解析
LLaMA的代码非常直观, 主要分三个部份:
- generation.py 这里包含了sampling的实现
- model.py 这里包含了Transformer的实现
- tokenizer.py 这里包含了tokenizer的实现. Tokenizer比较简单, 就是使用了最常见的SentencePiece(vocab_size=32000). 本文就不再分析了.
下面分别分析一下Sampling和Model的部份.
Sampling
Decoding常见的方法有beam search和temperature sampling. Beam search结果可靠, 准确度较高, 常见于翻译类应用; temperature sampling的结果有随机性, 能产生更多样性的结果, 常见于chatbot类应用. LLaMA的开源代码中使用的是后者.
Temperature sampling的过程如下:
- 用SentencePiece tokenizer把prompt变成tokens (int list)
- 模型(transformer) 输入tokens, 输出一个 vocab_size大小的logits.
- 把logits除以temperature, 然后做softmax, 得到一个概率分布. 所以:
- temperature = 1 代表直接按照模型输出的分布来sample
- temperature = 0 代表直接取概率最大的token (aka greedy, 往往效果比较差)
- temperature = 0~1 代表按照按照模型输出的分布来sample, 但是更加偏向概率大的
- temperature > 1 (不常见) 代表把模型输出概率”压扁”(大的变小, 小的变大) 然后再sample , 当temperature无穷大时就是uniform sample
- 在该分布下进行sample, 得到next token, 并把next token放到输入tokens的末尾.
- 重复步骤2-4直到长度超限, 或者输出了EOS token.
用伪代码表示如下:
def generate(prompt, temperature):
	tokens = tokenizer.encode(prompt)
	while len(tokens) < MAX_CONTEXT_LENGTH:
		logits = model(tokens)
		logits /= temperature
		logits = topk(logits)
		next_token = sample(softmax(logits))
    if next_token = eos:
      break
		tokens.append(next_token)

  return tokenizer.decode(tokens)
因为sampling的过程是step by step的, 如果结果较长, 可以异步返回, 结合HTTP长连接的技术就可以实现像ChatGPT那样一个字一个字往外蹦的效果.
就sampling而言, 其实LLaMA和原始的Transformer, 或者说和任何其他语言模型都没有区别. 不过我还是发现了一些以前从没考虑过的问题, 例如:
- 在伪代码里, 对每一个step, 模型的输入是
tokens[:t], 输出是tokens[t+1](的logits), 这个在理论上是正确的, 但实际上是这样吗?
LLaMA官方的代码实现是这样的:
start_pos = min_prompt_size
prev_pos = 0
for cur_pos in range(start_pos, total_len):
	logits = self.model.forward(tokens[:, prev_pos:cur_pos], prev_pos)
	# ...
	tokens[:, cur_pos] = next_token
	prev_pos = cur_pos
可以看到, 实际上只有在输出第一个output token的时候, 模型的输入是tokens[:t], 而后续的每个step, 模型只输入了最后一个token. 为什么是这样呢?
attention(q[-1], k[:t], v[:t]) 有关. 所以对于q[:t] 部份的attention不需要重复计算, 只需cache住k[:t]和 v[:t]即可.
- Batch prediction和单个prediction有什么区别?
如果对generate代码进一步研究, 会发现batch prediction并不一定会比单条更高效! 你能解释下面高亮部份的代码是在干什么吗?
start_pos = min_prompt_size
prev_pos = 0
for cur_pos in range(start_pos, total_len):
    logits = ...
    # only replace token if prompt has already been generated
    next_token = torch.where(
        input_text_mask[:, cur_pos], tokens[:, cur_pos], next_token
    )
    tokens[:, cur_pos] = next_token
    prev_pos = cur_pos

decoded = []
for i, t in enumerate(tokens.tolist()):
    # cut to max gen len
    t = t[: len(prompt_tokens[i]) + max_gen_len]
    # cut to eos tok if any
    try:
        t = t[: t.index(self.tokenizer.eos_id)]
    except ValueError:
        pass
    decoded.append(self.tokenizer.decode(t))
理论上,Batch prediction把多条prompt一起输入模型,借助GPU的并行计算, 会比单条的prediction更高效. 但实际上并非如此:
- 在单条的prediction中, 碰到EOS就可以退出了. 但是在batch prediction中, 你无法预先知道会输出多长, 所以只能指定一个max length, 最后再根据EOS的位置进行cut off. 这必然造成计算量的浪费.
- 对于单条的prediction, 只要从prompt末尾开始就可以了. 但是对于batch, 要从最短的一个prompt的末尾开始, 并且要小心不要覆盖已有的prompt (上面代码中torch.where的作用).
(所以, 也有人在实现的时候是从左边做padding,让输入按最右侧对齐)
Transformer Model
以7B的模型为例, 模型参数为
- dim=4096 Transformer的每一层(Decoder Layer)的输入、输出大小 (batch_size, seq_len, dim)
- n_layers=32 Decoder的个数
- n_heads=32 multihead attention 中head的个数.
- head_dim = dim / n_heads = 4096 / 32 = 128 (从dim和n_heads可推算)
- vocab_size=32000 Vocabulary中token的个数
class Transformer
这个类包含了Transformer的总体逻辑.
Input
- tokens: (batch_size, seq_len) 输入的token, 如前文分析, 第一次调用时输入的是整个prompt, seq_len = min_prompt_length; 后续每次输入最后一个生成的token, seq_len=1.
- start_pos: int 输入的是token开始的位置, 第一次调用时为0, 后续为当前输出位置.
Output (batch_size, vocab_size) 每个prompt的next token logits.
Transformer的逻辑如下:
# token to embedding
# tokens (batch_size, seq_len)
# embedding (batch_size, seq_len, dim)
h = self.tok_embeddings(tokens)

# "complex numbers" for Positional embedding (RoPE)
# shape: (seq_len, head_dim/2)
freqs_cis = ...

# Attention mask
# 在第一次调用时, mask是一个三角矩阵 (causal attention mask, shape t x t)
# 后续step mask=None, 因为输入只有最后一个token, 它可以跟任意前面的k, v交互.
mask = ...

# Decoder layers x 32
# input shape = output shape (batch_size, seq_len, dim)
for layer in self.layers:
    h = layer(h, start_pos, freqs_cis, mask)

# RMSNorm (batch_size, seq_len, dim)
h = self.norm(h)

# Output layer
# embedding(dim) => logits(vocab_size)
# only compute last logits (batch_size, 1, vocab_size)
output = self.output(h[:, -1, :])
return output.float()
其中tok_embeddings和output都只是普通的Feed Forward. RMS normalization本文略去不讲.
class TransformerBlock
这个类包含了Decoder layer的实现 (上面代码中高亮的部份).
Input
- x: (batch_size, seq_len, dim) 也就是Transformer里面的h, 输入的token embedding
- start_pos: int 输入的是token开始的位置, 第一次调用时为0, 后续为当前输出位置.
- freqs_cis: (seq_len, head_dim/2) 每个位置预计算好的RoPE embedding的"复数" $e^{il}$. (因为一个复数是两个数字, 所以head_dim/2). 计算RoPE的过程可以看 apply_rotary_emb 这个函数, 基本就是先把xq, xv也转成复数, 然后直接和 freqs_cis 相乘得到.
- mask: causal attention mask. 在第一次调用时, mask是一个三角矩阵 (causal attention mask, shape t x t). 后续的调用中mask=None, 因为输入只有最后一个token, 它可以跟任意前面的k, v交互.
Output
(batch_size, seq_len, dim) Decoder block的输出, 也是下一个Decoder block的输入(所以output shape和input保持一致)
Decoder Layer的逻辑非常直观, 几乎就跟前面的伪代码一致, 只是多传了 start_pos, RoPE, mask这些参数.
h = x + self.attention.forward(self.attention_norm(x), start_pos, freqs_cis, mask)
out = h + self.feed_forward.forward(self.ffn_norm(h))
return out
这里面一共有attention, feed_forward和norm三种layer, 接下来只分析Attention.
class Attention
接下来就是重头戏了, 这是Transformer里被认为最关键的一个结构Attention (上面代码中的红色部份).
因为attention是decoder layer中的第一个结构(忽略不改变形状的norm), 所以它的Input 和上面Decoder Layer中描述的一样, 而output shape也一样, 所以我们不再重复了, 这里重点分析一下它到底在计算什么:
- 把embedding拆分成多个head, 也就是从(batch_size, seq_len, dim) 变成了 (batch_size, seq_len, n_heads, head_dim):
xq = xq.view(bsz, seqlen, self.n_local_heads, self.head_dim)xk = xk.view(bsz, seqlen, self.n_local_heads, self.head_dim)xv = xv.view(bsz, seqlen, self.n_local_heads, self.head_dim)
- 按照RoPE的定义计算positional embedding. 这里有个细节, 只有query和key计算了positional embedding, 而value没有计算.
xq, xk = apply_rotary_emb(xq, xk, freqs_cis=freqs_cis)
- 从kv cache中取出前t-1个step的k和v, 并和当前step的k,v 合并到一起
self.cache_k = self.cache_k.to(xq)
self.cache_v = self.cache_v.to(xq)

self.cache_k[:bsz, start_pos : start_pos + seqlen] = xk
self.cache_v[:bsz, start_pos : start_pos + seqlen] = xv

keys = self.cache_k[:bsz, : start_pos + seqlen]
values = self.cache_v[:bsz, : start_pos + seqlen]
- 最后, 计算multi head attention
xq = xq.transpose(1, 2)
keys = keys.transpose(1, 2)
values = values.transpose(1, 2)
scores = torch.matmul(xq, keys.transpose(2, 3)) / math.sqrt(self.head_dim)
if mask is not None:
    scores = scores + mask  # (bs, n_local_heads, slen, cache_len + slen)
scores = F.softmax(scores.float(), dim=-1).type_as(xq)
output = torch.matmul(scores, values)  # (bs, n_local_heads, slen, head_dim)
output = output.transpose(
    1, 2
).contiguous().view(bsz, seqlen, -1)

return self.wo(output)
这里我们再分析一下, multi head attention和 single head attention的关系是什么?
对于multi head, 它的计算过程如下:
- 把q,k,v的head维度交换到前面 (batch_size, seq_len, n_heads, head_dim) ⇒ (batch_size, n_heads, seq_len, head_dim)
- 把 batch_size和n_heads 看作一个整体的batch维度, 然后计算 score = (q * k.T) / sqrt(head_dim)
- output = score * v
- 把output的head交换回来, 然后把多个head进行合并. (batch_size, n_heads, seq_len, head_dim) ⇒ (batch_size, seq_len, n_heads, head_dim) ⇒ (batch_size, seq_len, dim)
假如把batch维度拿掉:
- single head中的矩阵乘法是 (seq_len, dim) * (dim, seq_len), 复杂度为 O(seq_len^2 * dim)
- 对于multi head, 它的矩阵乘法为n_head个独立的(seq_len, head_dim) * (head_dim, seq_len)
复杂度为 O(n_head * seq_len^2 * head_dim) = O(seq_len^2 * dim)
所以, 本质上multi head相当于把embedding拆成n份, 然后每一份单独做attention, 总体计算复杂度和single head attention是一样的.
实验
关于内存占用
理论上7B的模型的内存占用大约为7x2 = 14GB (使用float16). 但是如果运行官方LLaMA代码, 发现内存占用为22GB. 多出来的内存是怎么被用掉的呢? 前面讲到, inference的时候是有kv cache的,
每层Decoder Layer的key/value cache的大小为:
(max_batch_size, max_seq_len, n_heads, head_dim) = [32, 512, 32, 128]
所以总cache大小为
2 (k, v caches) * 32 (layers) * 32 (max batch size) * 512 (max seq len) * 32 (number of heads) * 128 (head dim) * 2bytes/param = 8G
加上模型的14GB, 刚好是22GB左右. 所以要降低内存占用量, 主要的方法是就要减少max batch size和max sequence length. 对于ChatBot来说这不是个问题, 只要设置batch size=1即可
在刚刚发布的Falcon模型中, 使用了multi-query attention (7B) 和 group query attention (40B), 在多个head中共用key 和value (每个head的query仍然不一样), 减少了k v cache的大小, 从而减少inference时的内存占用. 这里有一个对multi/group query attention的一个直观解释.
Prompting
这里用LLaMA的inference代码进行sentiment analysis.
我们从Metacritic上找来一些对《塞尔达传说: 王国之泪》的评论, 然后让LLaMA来判断评论是正面还是负面. 注意LLaMA是一个语言模型而不是ChatBot, 所以要用补全的任务去提示它, 而不是问它问题.
Exp 1
我们用这样一个prompt, 希望模型能输出positive或者negative:
`The game is perfect. It’s much more interesting than breath of the wild! However, it is dragged down by the performance of NS. The frame number is not stable enough.`

The sentiment of the comment above is
然而事与愿违, 模型输出的是
The sentiment of the comment above is not uncommon
所以我们发现了使用LM(相对于传统的classification)来做情感分析的缺点1: 模型的输出过于灵活, 以至于不一定输出我们想要的答案格式
Exp 2
修改prompt为以下形式:
`The game is perfect. It’s much more interesting than breath of the wild! However, it is dragged down by the performance of NS. The frame number is not stable enough.`

Question: What is the sentiment of the comment above, positive or negative?
Right Answer:
这次模型输出的结果是:
Right Answer: Negative
又实验几个其他的comment, 发现模型能够稳定输出positive或者negative了. 这基本解决了缺点1, 但是还有一个问题: 在传统classification中, 模型是能输出一个0-1之间的数值, 这个数值代表了模型认为它是negative还是positive的一个confidence. 如果使用生成式模型, 只输出label, 没有办法知道模型的confidence. 以上面这个例子而言, 其实这条评论前部份是positive, 后半部份是negative, 难以用一个词来概括. 这是生成式模型做情感分析的缺点2.
Scoring
那么, 有没有办法让LLaMA输出结果的同时, 给出一个score代表这个结果的confidence或者likelihood呢? 我们知道LM每一步的输出的logits求一个softmax就是 p(x[t] | x[:t]), 所以只要把log_softmax相加就可以得到一个score:
class LLaMA:
    ...

	def score(
		self,
		prompt: str,
		answer: str,
	):
		score = 0
		prompt_tokens = torch.tensor(self.tokenizer.encode(prompt, bos=True, eos=False)).cuda().long().reshape((1,-1))
		answer_tokens = torch.tensor(self.tokenizer.encode(answer, bos=False, eos=False)).cuda().long().reshape((1,-1))

		# first answer token
		logits = self.model.forward(prompt_tokens, 0)
		score += torch.log_softmax(logits, dim=-1)[0, answer_tokens[0, 0]]

		for pos in range(answer_tokens.shape[-1]-1):
			logits = self.model.forward(answer_tokens[:, pos:pos+1], prompt_tokens.shape[-1])
			score += torch.log_softmax(logits, dim=-1)[0, answer_tokens[0, pos+1]]

		return score
有了这个score以后, 我们可以分别求 score(prompt, “Negative”) 和 score(prompt, “Positive”), 然后求一个softmax来得到一个0-1之间的数值, 表示它的情感正负值.
以下是几个scoring的实验结果:
`The game is perfect. It’s much more interesting than breath of the wild! However, it is dragged down by the performance of NS. The frame number is not stable enough.`
softmax = [positive=0.2613, negative=0.7387], score_pos=-2.2791, score_neg=-1.2401
`The perfect game, loads of mechanics and incredible creativity Definitely the game of the year`
softmax = [positive=0.5868, negative=0.4132], score_pos=-1.4431, score_neg=-1.7939
`2000 graphics, awful gameplay, reused map from the last game. Overpriced dlc to an already terrible game, not unusal from nintendo to produce terrible games, reuse 20 years assets and sell the game for a huge markup. Story 0/10, gameplay 0/10, graphics 0/10.`
softmax = [positive=0.1095, negative=0.8905], score_pos=-3.0722, score_neg=-0.9763
需要注意的是这样的scoring仍然跟传统的classification有很大区别, 原因是:
- LLM的输出范围是整个vocabulary. 所以如果你观察整个logits, 输出Positive和Negative的概率都是相对高的, 比输出其他token的概率高. 在这里我们相当于是对模型输出”Positive”和”Negative”的概率进行比较来给出一个score.
- scoring的前提是你要预判模型会输出什么. 举例来说, 即使对一个正面的例子, score(”Negative”)会比score(小写的”positive”)高, 因为模型的概率分布中这里的回答大写的概率高.
- score跟回答的句子长度有关. (token长度越长, 概率就越低) 如果两个answer长度不一样, 那就不能简单的用score来比较.
- 还有个比较subtle的问题, Positive和Negative会被SentencePiece切成[Pos, itive] 和 [Neg, ative]
所以
$$ score(prompt, Positive) = score(Pos | prompt) \cdot score(itive | prompt, Pos) $$ $$ score(prompt, Negative) = score(Neg | prompt) \cdot score(ative | prompt, Neg) $$
假如我们心中的正确答案是Positive, 那么模型输出 score(Pos | p) > score(Neg | p) 是没问题的, 但是在第二步, 因为假设模型已经输出了Neg, 那么很大可能 score(ative | p, Neg) > score(itive | p, Neg). 所以这一步的score其实没有太大意义了.
Attention Weights的分析
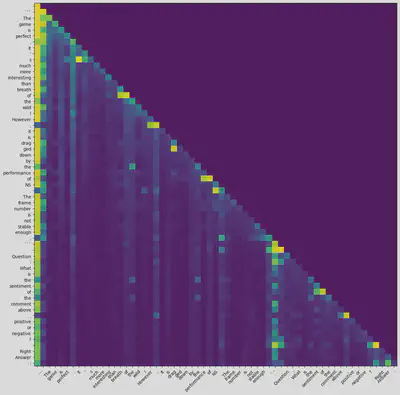
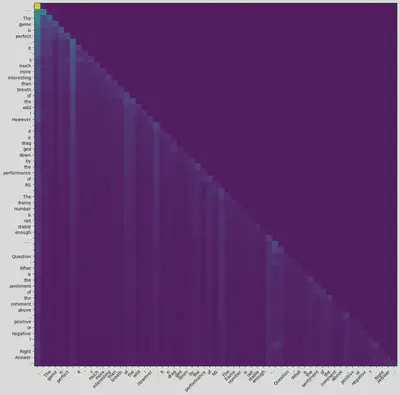
一种分析transformer的方法是把attention weights matrix打印出来, 看看各个token之间的attention是多少. 由于LLaMA使用的是multi head attention, 所以其实有n_heads = 32个不同的weight matrix (seq_len x seq_len). 我们这里简单粗暴, 直接取每个head的均值或最大值来分析. ( 这篇论文里提到了一个更fancy的方法, 不过我还没有仔细研究) 另外需要说明的一点是我们只研究第一层(最靠近输入的那一层)attention的weight matrix.
注: Attention weights在这个score变量里.
以这个句子为例
The game is perfect. It’s much more interesting than breath of the wild! However, it is dragged down by the performance of NS. The frame number is not stable enough.
Question: What is the sentiment of the comment above, positive or negative?
Right Answer:
模型在读到末尾时, 输出的max attention和average attention分别为

好像乍一看没法看出什么, 但是如果把”sentiment”这个词和其他词的attention单独打印, 发现如下的score:
sentiment 0.08599853515625
 0.06610107421875
. 0.049346923828125
``` 0.048248291015625
. 0.0439453125

 0.043304443359375
the 0.039154052734375
, 0.033111572265625
of 0.032073974609375
. 0.0291748046875
: 0.0286102294921875
of 0.0279388427734375
the 0.0266571044921875
the 0.023712158203125
is 0.022430419921875
Question 0.0214691162109375
What 0.0204925537109375
by 0.0200653076171875
The 0.017822265625
is 0.0173797607421875
is 0.0164031982421875
``` 0.0159759521484375
stable 0.0150604248046875
than 0.0137939453125
not 0.01311492919921875
enough 0.01275634765625
is 0.01256561279296875
The 0.01212310791015625
! 0.0118865966796875
However 0.01165008544921875
frame 0.01100921630859375
interesting 0.01088714599609375
s 0.01052093505859375
number 0.0103302001953125
NS 0.010101318359375
drag 0.01001739501953125
it 0.00986480712890625
performance 0.00970458984375
It 0.009613037109375
breath 0.009246826171875
perfect 0.00911712646484375
ged 0.00904083251953125
more 0.00893402099609375
down 0.00890350341796875
much 0.00856781005859375
wild 0.0082550048828125
’ 0.0073394775390625
game 0.006198883056640625
the 0.0
positive 0.0
or 0.0
of 0.0
negative 0.0
comment 0.0
above 0.0
Right 0.0
Answer 0.0
? 0.0
: 0.0
, 0.0
除去排名较高的没有什么意义的词, 可以看到 “not stable enough”, “However”这些词的score大于”perfect”, “interesting”这些词. 这在一定程度上可以解释模型为什么认为这个评论的负面大于正面 (当然, 从结果而言模型这里的判断是错的, 因为这个评论后面给了10分).
一些其他的开源模型
除了LLaMA和前面提到的Falcon之外,还有很多其他开源模型, 例如和LLaMA完全一样的Vicuna和Alpaca, 以及略有区别的StableLM, RedPajama, Pythia 等等. 事实上这些模型的区别非常小(个别参数和数据集的区别), 以至于可以共用一套代码来实现.
Future Work
本文只分析了inference部份的代码, 因为官方没有放出training部份. 相对于inference来说, training会有以下区别:
- 由于data是已知的, training是完全并行的: input是
tokens[:t], output是tokens[1:t+1] - training包含了optimizer (LLaMA使用的是AdamW)
- training需要非常多的计算资源 (数据量大, batch size大, 多GPU并行) 普通人根本玩不起.
不过小数据集的finetuning和adapter tuning还是可以玩的, 有兴趣可以参见Lit-LLaMA.